Ironbin


  • 首页

  • 关于

  • 标签

  • 分类

  • 归档

  • 搜索

Mac OS 安装 nginx, php, mysql

发表于 2015-05-07 | 分类于 mac | | 阅读次数:

常用位置:

  1. nginx:

    • 安装位置:/usr/local/Cellar/nginx
    • log: /usr/local/var/log/nginx/error.log
    • 配置位置:/usr/local/etc/nginx
    • document root: /var/www
  2. php

    • 安装位置:/usr/local/Cellar/php56/5.6.8/
    • 配置位置:/usr/local/etc/php/5.6/php.ini
  3. mysql

    • 查看server信息:mysqld --help --verbose
    • 安装位置:/usr/local/Cellar/mysql

安装

引用一篇非常详细的博客:Install Nginx, PHP-FPM, MySQL and phpMyAdmin on OS X Mavericks or Yosemite

Xcode

1
xcode-select --install

Homebrew

1
ruby -e "$(curl -fsSL https://raw.githubusercontent.com/Homebrew/install/master/install)"

Check for any conflicts or problems (If you have confilcts, sort them out before you continue with this guide):

1
brew doctor

Update and upgrade its formulas in case you already had Homebrew installed before:

1
brew update && brew upgrade

PHP-FPM

1
2
brew tap homebrew/dupes
brew tap homebrew/php

Now install it with the following arguments:

1
brew install --without-apache --with-fpm --with-mysql php56

Setup PHP CLI binary

If you want to use the PHP command line binary, you need to update the $PATH environment variable of your shell profile:

1
2
3
4
5
6
7
# If you use Bash    
echo 'export PATH="/usr/local/sbin:$PATH"' >> ~/.bash_profile
. ~/.bash_profile

# If you use ZSH
echo 'export PATH="/usr/local/sbin:$PATH"' >> ~/.zshrc
. ~/.zshrc

Setup auto start

Create a folder for our LaunchAgents and symlink the start/stop service:

1
2
mkdir -p ~/Library/LaunchAgents
ln -sfv /usr/local/opt/php56/homebrew.mxcl.php56.plist ~/Library/LaunchAgents/

And start PHP-FPM:

1
launchctl load -w ~/Library/LaunchAgents/homebrew.mxcl.php56.plist

Make sure PHP-FPM is listening on port 9000:

1
lsof -Pni4 | grep LISTEN | grep php

The output should look something like this:

1
2
3
4
php-fpm   69659  frdmn    6u  IPv4 0x8d8ebe505a1ae01      0t0  TCP 127.0.0.1:9000 (LISTEN)
php-fpm 69660 frdmn 0u IPv4 0x8d8ebe505a1ae01 0t0 TCP 127.0.0.1:9000 (LISTEN)
php-fpm 69661 frdmn 0u IPv4 0x8d8ebe505a1ae01 0t0 TCP 127.0.0.1:9000 (LISTEN)
php-fpm 69662 frdmn 0u IPv4 0x8d8ebe505a1ae01 0t0 TCP 127.0.0.1:9000 (LISTEN)

MySQL

Next step is to install MySQL:

1
brew install mysql

Setup auto start

1
ln -sfv /usr/local/opt/mysql/*.plist ~/Library/LaunchAgents

And start the database server:

1
launchctl load ~/Library/LaunchAgents/homebrew.mxcl.mysql.plist
1
mysql_secure_installation

Test connection

1
mysql -uroot -p

phpMyAdmin

Install autoconf, which is needed for the installation of phpMyAdmin:

1
brew install autoconf

Set $PHP_AUTOCONF:

1
2
3
4
# If you use Bash
echo 'PHP_AUTOCONF="'$(which autoconf)'"' >> ~/.bash_profile && . ~/.bash_profile
# If you use ZSH
echo 'PHP_AUTOCONF="'$(which autoconf)'"' >> ~/.zshrc && . ~/.zshrc

Let’s start with the installation of phpMyAdmin:

1
brew install phpmyadmin

Nginx

Install the default Nginx with:

1
brew install nginx

Setup auto start

Since we want to use port 80 have to start the Nginx process as root:

1
2
sudo cp -v /usr/local/opt/nginx/*.plist /Library/LaunchDaemons/
sudo chown root:wheel /Library/LaunchDaemons/homebrew.mxcl.nginx.plist

Test web server

Start Nginx for the first with:

1
sudo launchctl load /Library/LaunchDaemons/homebrew.mxcl.nginx.plist

Stop Nginx again:

1
sudo launchctl unload /Library/LaunchDaemons/homebrew.mxcl.nginx.plist

Make alias:

1
2
3
4
5
6
7
8
9
10
11
12
13
14
15
alias nginx.start='sudo launchctl load /Library/LaunchDaemons/homebrew.mxcl.nginx.plist'
alias nginx.stop='sudo launchctl unload /Library/LaunchDaemons/homebrew.mxcl.nginx.plist'
alias nginx.restart='nginx.stop && nginx.start'
alias php-fpm.start="launchctl load -w ~/Library/LaunchAgents/homebrew.mxcl.php56.plist"
alias php-fpm.stop="launchctl unload -w ~/Library/LaunchAgents/homebrew.mxcl.php56.plist"
alias php-fpm.restart='php-fpm.stop && php-fpm.start'
alias mysql.start="launchctl load -w ~/Library/LaunchAgents/homebrew.mxcl.mysql.plist"
alias mysql.stop="launchctl unload -w ~/Library/LaunchAgents/homebrew.mxcl.mysql.plist"
alias mysql.restart='mysql.stop && mysql.start'
alias nginx.logs.error='tail -250f /usr/local/etc/nginx/logs/error.log'
alias nginx.logs.access='tail -250f /usr/local/etc/nginx/logs/access.log'
alias nginx.logs.default.access='tail -250f /usr/local/etc/nginx/logs/default.access.log'
alias nginx.logs.default-ssl.access='tail -250f /usr/local/etc/nginx/logs/default-ssl.access.log'
alias nginx.logs.phpmyadmin.error='tail -250f /usr/local/etc/nginx/logs/phpmyadmin.error.log'
alias nginx.logs.phpmyadmin.access='tail -250f /usr/local/etc/nginx/logs/phpmyadmin.access.log'

发布到 App Store

发表于 2015-02-15 | 分类于 ios | | 阅读次数:

一 一些名词

App ID:应用的标识

  • 格式:上由2部分组成: <Bundle Seed ID>.<Bundle Identifier>,例如,ABCDE12345.com.foocompany.appname:

    • ABCDE12345 是 Bundle Seed ID (苹果生成)
    • com.foocompany.appname is the App ID’s Bundle Identifier and needs to be the same as your app’s Bundle Identifier
  • 分类: 通配符方式(wildcard) VS 显示定义(explicit)

    • 通配符方式: 一般的ID都应该用此方式,理由是一个 Wildcard App ID 可用于编译和安装多个 App。注意星要放到最后
      Example App ID: ABCDE12345.com.foocompany.*
    • 显示定义:只能用于一个 App,但是,如果你的应用需要诸如 In App Purchase and Apple Push Notification service 的功能,你就必须使用显示定义
      Example App ID: ABCDE12345.com.foocompany.appname

扩展阅读:Q: When should I use a wildcard App ID vs. an explicit App ID?

  • Provisioning profile:配置文件

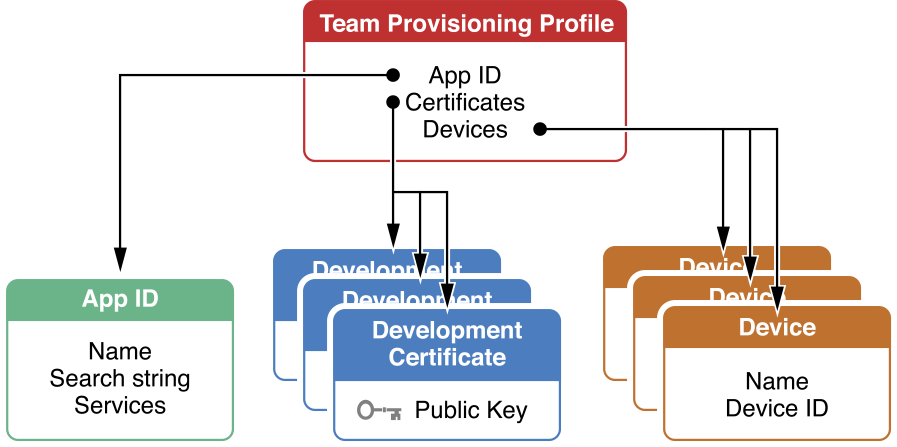
开始 ios 开发时,最大的不适就是复杂的测试发布限制,你不能简单的编译个 app 放到任一设备中运行。比如符合 Provisioning profile 的设定。A picture worth a thousand words,先看下面的图:

一个 Provisioning profile 设置了 APP ID,证书和设备。当你使用某个 Provisioning profile 签名应用时,其实是使用它包含的证书来签名,并且签证对应的 APP ID,并只允许安装到被包含其中的设备中。

Certification:证书

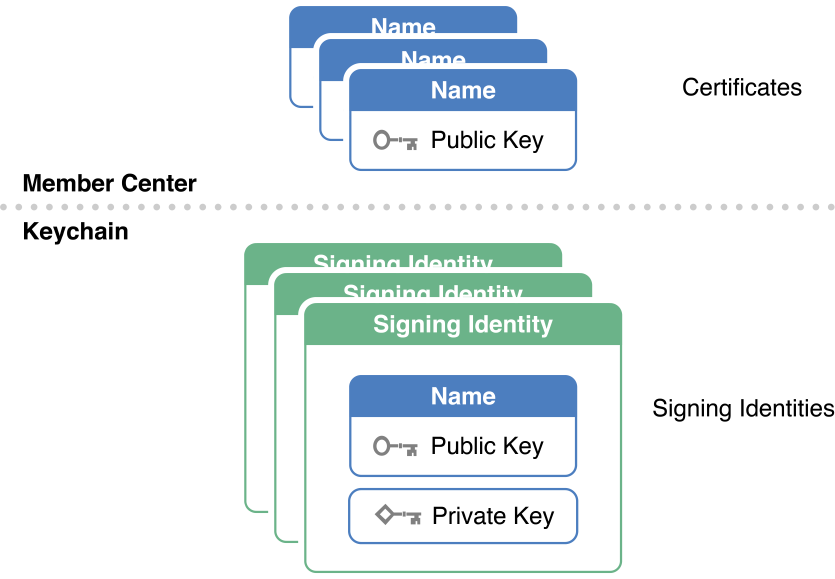
如上图所示,证书的公钥保存在苹果的用户中心,公私钥对保存到开发者 keychain 中。你必须有私钥才可以签名应用。

  • Development certification:开发证书
  • Adhoc certification:真机部署测试证书
  • Distribution certification:发布证书

Deployment Target:部署目标

面向的 ios 版本

iTunes Connect

This is the version number shown in the App Store; This must be a pure version number like1.2.3

Bundle Version (CFBundleVersion)

This doesn’t need to be a pure version number. This can be something like 12345 or 1.2.3 (Build 12345AB). This is shown in the About window for Mac OS X apps for example and is often more a “Build Number” than a “Version Number”. 真实版本号,用来判断版本信息的。

Bundle Version String (CFBundleShortVersionString)

This value is used as the “real” version number. This must be the same string as used for the version in iTunes Connect. 面向用户市场的束的版本字符串–用户看到的版本号;

二 流程

下载安装证书

配置编译参数

  • 设置 Deployment Target (部署目标)
    首选最新的 IOS 版本作为发布版本

填写 iTunes Connect 信息

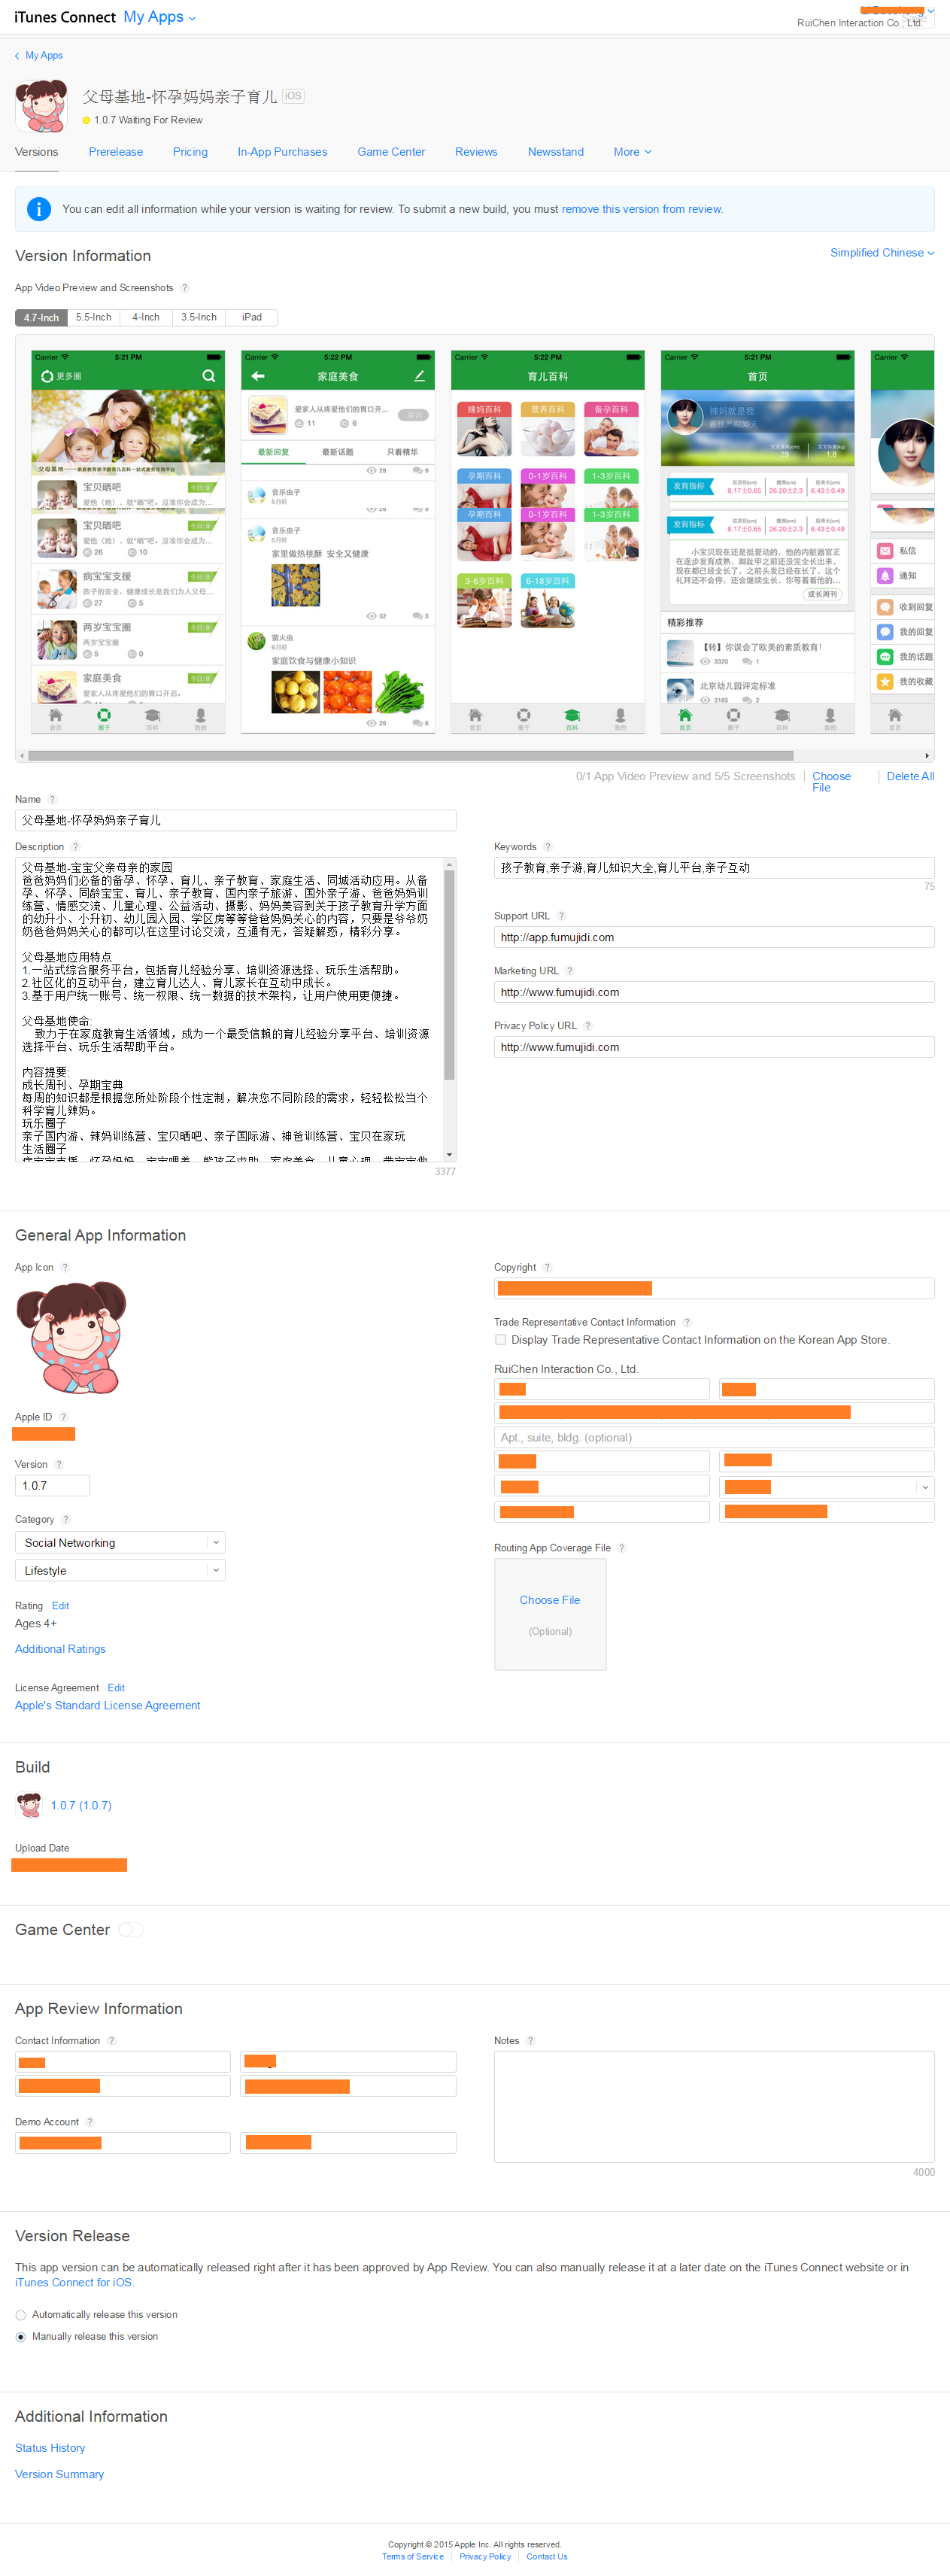
打开iTunes Connect,填表:

  1. 第一组:

    • 选择语言
    • 应用名称
    • skunumber:一个用来识别app的特殊字符串。
    • bundleID
  2. 第二组

    • 版本
    • 版权
    • 软件首类别
    • 次类别
    • 评级划分
    • 内容描述
    • 关键字
    • 技术支持url,以及下面的技术负责人的名字,姓,email,手机号码

填写完成后如下图所示:

上传安装包

使用 xcode 直接上传:

  1. 检查代码,去除 log,debug 等相关的信息
  2. 清理项目(clean project)
  3. 生成包文件(archive)
  4. 发送包文件(submit)
  5. 选择发布证书(注意要使用 Agent 账号上传)
  6. 发布成功

使用 application loader 上传

以后补充

itunes connect 关联上传的包文件

上传成功之后,在 Build 分类下,可以关联此包。

提交审核(submit for review)

以后补充

Grit - Chromium 国际化(2)

发表于 2015-01-31 | 分类于 chromium | | 阅读次数:

经过上一篇的分析,虽然对工作原理有了简单认识,但实际修改或添加支持多语言的文本还是蛮麻烦。所以这里提供一个小工具,简化这个流程。

下面说一下工具的使用:

1. 准备修改前的文件

  • 修改前的默认语言文件(grd)

    1
    chromium_strings.grd
  • 修改前的翻译文件(xtb)

    1
    chromium_strings_zh-CN.xtb

将2个文件放到工具的 old 目录中。

注意如果有的 grd 文件中引用了其它资源,需要将这些资源一并放到 old 目录中

2. 准备新的默认语言文件(grd)

根据需要,修改旧的默认语言文件,最好将新加的文本放到文档的最后,以便和 chromium 原有的文本作区分。修改完成后的将文件放到 new 目录中。 这里,我将修改好的 chromium_strings.grd 放置到 new 目录。

注意如果有的 grd 文件中引用了其它资源,需要将这些资源一并放到 old 目录中

3. 执行

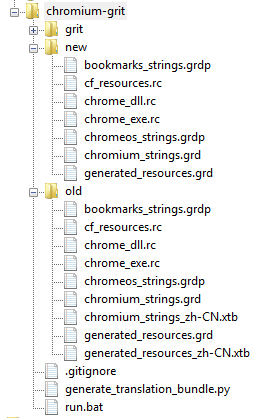
准备好的目录结构:

运行根目录的 run.bat,它会根据上面的三个文件生成新的翻译文件 xtb。

run.bat

1
2
3
4
5
6
7
8
9
10
11
@echo off

echo handling chromium_strings.grd...
python3 "generate_translation_bundle.py" "--old_grd" "old/chromium_strings.grd" "--old_xtb" "old/chromium_strings_zh-CN.xtb" "--new_grd" "new/chromium_strings.grd" "-o" "new/chromium_strings_zh-CN.xtb"
IF ERRORLEVEL 0 ECHO Success!

echo handling generated_resources.grd...
python3 "generate_translation_bundle.py" "--old_grd" "old/generated_resources.grd" "--old_xtb" "old/generated_resources_zh-CN.xtb" "--new_grd" "new/generated_resources.grd" "-o" "new/generated_resources_zh-CN.xtb"
IF ERRORLEVEL 0 ECHO Success!

cmd /k

新生成的 xtb 实际是 xml 格式,将包含三种类型的结点(node):

  • 未修改:该类结点和原结点格式一样
  • 修改:该类结点是修改了原文档内容,为了方便,生成文件会包含原翻译,用作参考。此类结点包含属性 TODO="NEED_UPDATE"
  • 新添加:该类结点是新添加的文本,为了方便,生成文件会包含默认语言(grd)的文本。此类结点包含属性 TODO="NEED_TRANSLATE"

如:

1
2
3
4
5
6
7
8
9
10
11
12
13
14
15
<?xml version="1.0" ?>
<!DOCTYPE translationbundle>
<translationbundle>
<translation id="6970811910055250180">正在更新设备...</translation>
...

<translation TODO="NEED-UPDATE" id="4109624392265076313">Chromium</translation>
...

<translation TODO="NEED-TRANSLATE" desc="Select the theme." id="233572109030077464">
Select Theme
</translation>
...

</translationbundle>

附: Chromium-grit 工具

提醒:

  • 保证 old 和 new 中的 grd 文件行数对应,因为是按照行号对应查找旧翻译文的,否则编译时出现错误
  • 如果修改 zh-CN 以外的语言,需要手动修改生成的 xtb 文件中 lang="zh-CN" 属性

Grit - Chromium 国际化(1)

发表于 2015-01-29 | 分类于 chromium | | 阅读次数:

整体流程

chrome_string 是关于国际化的项目(Project), 这是一个只包含 build step 定义的空项目, build step 中定义了该项目编译时执行的程序或命令。在VS2010下编辑build step 可以用文本编辑软件直接打开 chrome_strings.vcxproj。

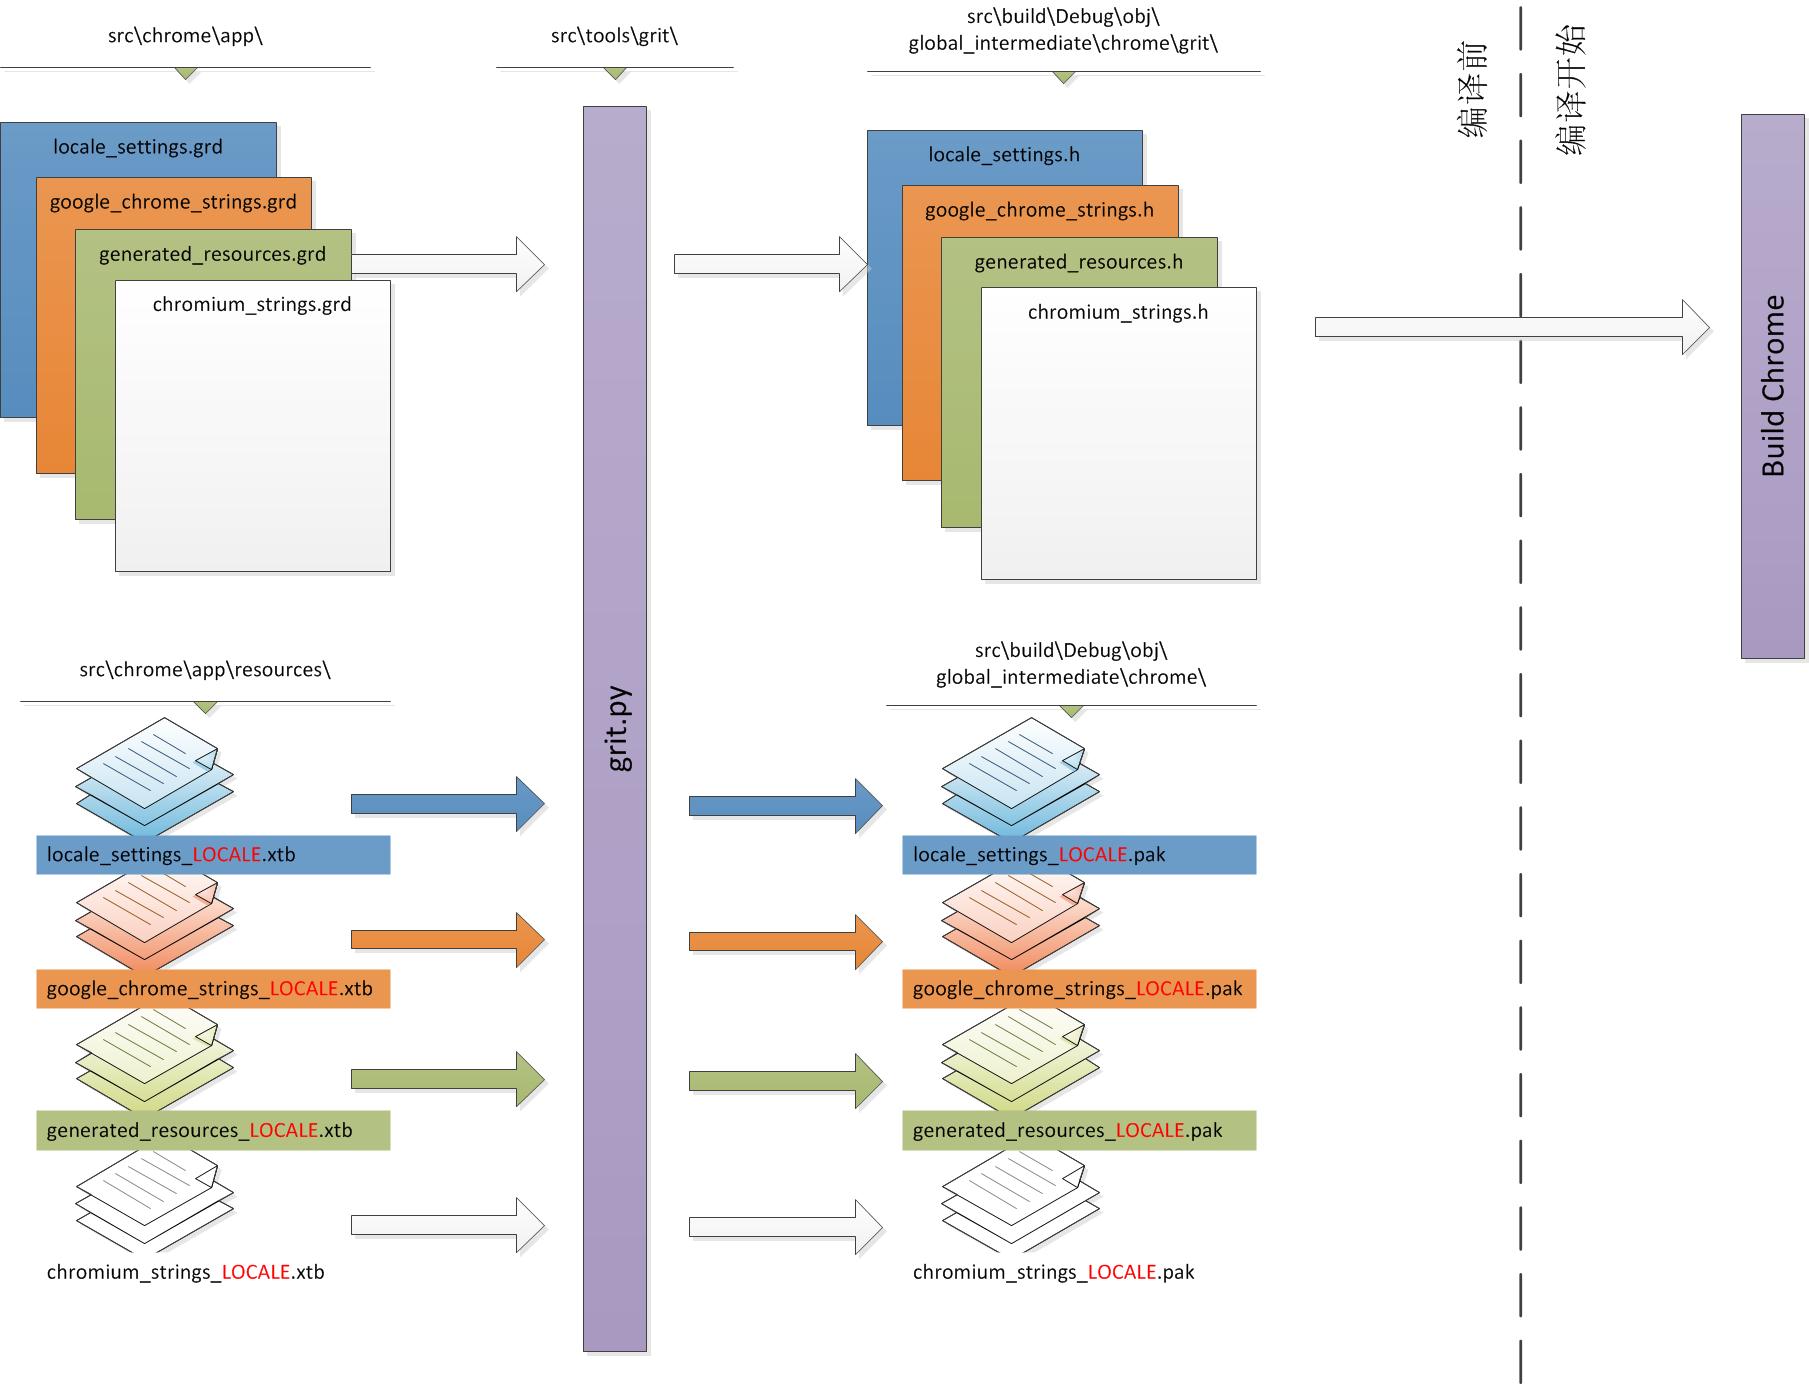
chrome_string 会在 chrome 编译之前编译,它将国际化定义的文件转换成资源文件(.pak)和 C++ 头文件,C++ 头文件将作为源代码在编译 chrome 时一起被编译。

语言包编译过程

Grit 工具

grit(Google Resource and Internationalization Tool)是一个python开源工具,用于支持多国际化,位于 src/tools/grit 目录下。chrome_string 编译时会执行 grit.py 可以,然后由grit工具将grd和xtb文件编译成pak资源文件。

国际化文件分类

  • generated_resources.grd:该文件定义了大部分国际化字符串定义,包括按钮的文字,窗口的标题等。
  • chromium_string.grd:文件包括 generated_resources.grd 之外的国际化字符串定义,其中包含“安装、卸载”、“关于”等内容,把它独立出来主要是因为要和谷歌chrome 区别开来。
  • google_chrome_strings.grd:用于编译 chrome 时使用,是和 chromium_string.grd 相对应的一个文件。
  • locale_settings.grd:该文件定义了多语言的样式配置,例如窗口的大小,某些控件的尺寸,样式可以根据语言的不同而变化。

国际化文件的格式

grd 文件格式

1
2
3
4
5
6
7
8
9
10
11
12
13
14
15
16
17
18
19
20
21
22
<grit base_dir="." latest_public_release="0" current_release="1"
source_lang_id="en" enc_check="m?l">
<outputs>
<output filename="grit/google_chrome_strings.h" type="rc_header">
<emit emit_type='prepend'></emit>
</output>
<output filename="google_chrome_strings_zh-CN.pak" type="data_package" lang="zh-CN" />
…
</outputs>
<translations>
<file path="resources/google_chrome_strings_zh-CN.xtb" lang="zh-CN" />
…
</translations>
<release seq="1" allow_pseudo="false">
<messages fallback_to_english="true">
<message name="IDS_PRODUCT_NAME" desc="The Chrome application name">
Google Chrome
</message>
…
</messages>
</release>
</grit>

grd 是xml的格式,它有三个部分: outputs、translations、release。

  • outputs 中定义编译出的C++头文件的位置和语言资源文件的位置,默认是在 src/build/Debug 或 Release/obj/global_intermediate/chrome/
  • translates 中定义了多语言的定义文件的位置,每一种支持的语言都应该有一个翻译文件,这些文件将作为输入。
  • release 中的 messages 定义的是默认语言的定义,当程序 找不到合适的语言显示时,将使用默认语言中的定义。
    message 的属性如下:
    • name:标识一个字符串的变量名
    • desc:该变量的介绍
    • translateable:是否使用翻译,默认true
    • use_name_for_id:是否使用name作为翻译的id标识。默认是false,翻译文件(xtb)中的id使用转换后的数字做映射;如果true,则使用 name 的值来和 grd 文件中的记录来映射。

xtb 文件格式

1
2
3
4
5
<!DOCTYPE translationbundle>
<translationbundle lang="zh-CN">
<translation id="6676384891291319759">访问互联网</translation>
…
</translationbundle>

xtb 是多语言的翻译文件,也是xml格式,每种语言对应一个xtb文件。<translateion/> 结点中的 id 的数字对应于 grd 文件中 <message/> 中的 name 或 content 值,注意默认不是根据 name,而是根据内容来生成 id值,这样的好处是可以去除冗余的文字。 转换的过程定义在 /src/tools/grit/external/FP.py 中。

国际化自定义步骤

  1. 打开 grd 文件,添加 message 结点,或找到要修改的 message 结点;
  2. 根据 message 的内容运行grit 工具,得到翻译文件 xtb 的id值;
  3. 打开要修改的 xtb 文件,每种语言对应一个xtb 文件, 新建 translation 结点,id为第2步中计算得到的 id 值,结点内容为对应语言的翻译, 如果不知道如何计算 id,也可以 将 message 结点的属性use_name_for_id 设置成true,则 translate 的id 对应为 message 的name值;
  4. 重新编译 chrome_string 项目,生成新的头文件和资源包。

改动文件:

1
2
3
4
chromium_strings.grd
generated_resource.grd
chromium_strings_zh-CN.xtb
generated_resources_zh-CN.xtb

常用的正则表达式

发表于 2015-01-25 | 分类于 program | | 阅读次数:

常用表达式

1. 中文字符

1
/[\u4e00-\u9fa5]/

2. 邮箱

1
/^([a-z0-9\+_\-]+)(\.[a-z0-9\+_\-]+)*@([_a-z0-9]+\.)+[a-z]{2,5}$/

3. 多个单词或

1
/(?:apple|banna)/

4. 不包含某个单词

1
/^((?!hede).)*$/

参考:

  • Exclude a String
  • 正则表达式里字符串”不包含”匹配技巧
  • A regular expression to exclude a word/string

5. 神奇的全部 ASCII 字符

1
2
/[ -~]/
/[\x20-\x7E]/

解释:ASCII 表中大于空格(0x20),小于~(0x7E)的字符为全部的打印字符。

6. 处理 HTML 标签

参考:

  • Using a Regular Expression to Match HTML
  • All about HTML tags

7. 使用空格分隔中文和英文单词

1
2
3
([\x{4E00}-\x{9FA5}])([a-z0-9@#&;=_\[\$\%\^\*\-\+\(\/]+)

$1 $2

JavaScript

Modifier Description
i Perform case-insensitive matching
g Perform a global match (find all matches rather than stopping after the first match)
m Perform multiline matching

收集了一些总结的很好的文章:

  • 最全的常用正则表达式大全
  • regular-expressions.info
  • RegExr

Linux 常用命令

发表于 2015-01-25 | 分类于 linux | | 阅读次数:

1 打开服务器的被禁用(blocked)端口(port)

  • 启用被 iptables 禁用的 80 端口
1
sudo /sbin/iptables -I INPUT -p tcp -m tcp --dport 80 -j ACCEPT
  • 将上面的配置作为规则保存到 iptables,以便服务器重启后,能再次生效
1
sudo /sbin/service iptables save

2 通过 systemctl 启动服务

  • 启动、停止、重启
1
2
3
# systemctl start nginx.service
# systemctl stop nginx.service
# systemctl restart nginx.service

除了 nginx.service, 常用的服务还有:php-fpm.service, mysqld.service

  • 设置开机自启
1
# systemctl enable nginx.service

3 查看进程信息

1
# ps -aux | grep 关键字

4 查看进程的安装位置

1
ps -ef | grep tomcat

5 sudo 保留系统环境

1
sudo -E env

6 查找最大目录或文件

1)查找最大目录

1
du -a | sort -n -r | head -n 5

2)查找最大文件

1
find -type f -exec du -Sh {} + | sort -rh | head -n 5

参考

7 挂载

1
$ sudo mount -t vboxsf 源媒体 目标路径

8 查找文件包含字符

1
2
3
4
5
6
7
8
9
10
11
# This will only search through those files which have .c or .h extensions:

$ grep --include=\*.{c,h} -rnw '/path/to/somewhere/' -e "pattern"

# This will exclude searching all the files ending with .o extension:

$ grep --exclude=*.o -rnw '/path/to/somewhere/' -e "pattern"

#For directories it's possible to exclude a particular directory(ies) through --exclude-dir parameter. For example, this will exclude the dirs dir1/, dir2/ and all of them matching *.dst/:

$ grep --exclude-dir={dir1,dir2,*.dst} -rnw '/path/to/somewhere/' -e "pattern"

我的快捷键

发表于 2015-01-10 | 分类于 computer | | 阅读次数:

Visual Studio

  • Ctrl + J : 智能提示
  • Ctrl + , : Display Navigate-To dialog box,大爱
  • Ctrl + ] : Go to matching brace in source file
  • Ctrl + Shift + ] : Extend selection to nexst brace
  • Ctrl + Alt + F: 搜索文件,尤其是整个项目
  • F3 / Shift + F3 : Find next / find previous
  • Ctrl + W : Select current word
  • Ctrl + l : Delete current line or selection of lines to and add to clipboard
  • Ctrl + Shift + Enter :Enter blank line below cursor
  • Ctrl + Shift + u : Make uppercase
  • Ctrl + u : Make lowercase (reverse upercase)
  • Ctrl + k + c : Comment selected text
  • Ctrl + k + u : Uncomment selected text
  • Ctrl + k + d : Format document to code formatting settings
  • Ctrl + k + f : Format selection to code formatting settings
  • F5 : Start debugging
  • Ctrl + F5 : Bypass debugger
  • F10 : Debug / step over
  • Shift + F11 : Debug / step out
  • Ctrl + F10 : Debug / run to cursor

Chrome

  • Ctrl + W : 关闭 Tab
  • Ctrl + T : 新建 Tab
  • Ctrl + Shift + T: 恢复上一个关闭的 Tab
  • Ctrl + L : 定位到 Location Bar
  • Ctrl + F : 搜索页面
  • F12 : 开发者模式
  • Ctrl + Shift + F : 搜索全部资源
  • Ctrl + Shift + Del : 清除缓存

Eclipse

  • Ctrl + Space : 智能提示
  • Ctrl + Shift + R : 搜索全部资源

UE

  • Ctrl + R : 替换

Sublime

  • Command + Control + ⬆ : 上移一行
  • Command + Control + ⬇ : 下移一行
  • Control + Shift + ⬆或⬇ : 多行编辑

Mac OS

按键

  • : Command/Apple Key (like Control on a PC) Also written as Cmd
  • : Option (like Alt on a PC)
  • : Shift
  • : Control (Control-click = Right-click)
  • : Tab
  • : Return
  • : Enter (on Number Pad)
  • : Eject
  • : Escape
  • : Page Up
  • : Page Down
  • : Home
  • : End
  • : Arrow Keys
  • : Delete Left (like Backspace on a PC)
  • : Delete Right (also called Forward Delete)
快捷键

  • Cmd + Shift + 3 : Take picture of the entire screen
  • Cmd + Shift + 4 : Take picture of a selected area
  • Cmd + Shift + 4 -> Space: Cmd-Shift-4, then press Spacebar, then Click on the window/object
  • Cmd + Opt + Esc : Force Quit (displayed list of apps)

XCode

  • Esc : 智能提示

PHPStorm

  • SHIFT + SHIFT : 智能查找
  • SHIFT + F6 : 智能提示
  • CTRL + D : 复制当前行或复制选中内容
  • CTRL + Y : 删除当前行或选中内容所涉及的行
  • CTRL + R : 查找替换
  • ALT + W : 选中单词
  • ALT + 上下箭头 : 向上向下函数间切换
  • CTRL + SHIFT + V : 显示最近粘贴板中的内容,选择后内容插入到光标位置
  • CTRL + Q : 显示说明文档
  • CTRL + B : 跳转到声明处
  • CTRL + N : 类名查找
  • CTRL + SHIFT + N : 文件名查找
  • CTRL + SHIFT + ALT + N : 函数名查找
  • ALT + SHIFT + C : 快速回顾最近修改的项目
  • CTRL + SHIFT + I : 查看变量初始化的值
  • CTRL + ALT + T : 插入环绕代码
  • CTRL + ALT + F12 : 跳转至当前文件所在磁盘上的位置
  • ALT + 左右键 : 标签切换
  • CTRL + F12 : 在当前类文件中快速查找方法

配置 Zend Studio, Xdebug

发表于 2014-12-01 | 分类于 php | | 阅读次数:

开发 PHP 过程中,经常不是一蹴而就的,某些疑难问题需要像本地程序一样调试。本文记录如何配置 Zend Studio 和 Xdebug,实现本地调试或远程(Remote)调试。

说到本地或远程调试,就要涉及到 PHP 的2种运行方式:CLI 和 CGI。

TIPS:什么是 CLI 和 CGI?

  • CLI(Command Line Interface),即“命令行界面”,是指在命令行界面的运行方式。比如在本地执行一个 PHP 脚本。
  • CGI(Common Gateway Interface),即“通用网关接口”,是 HTTP 服务器和脚本解释器之间的接口。通过这个通用接口,可以忽略 HTTP 服务器或脚本解释器的技术限制。HTTP 服务器常用的就是 Apache,Lighttpd,Nginx,Tomcat等,脚本解释器常用的有 PHP,ASP,JSP 等解释器。

安装 Xdebug

A. 安装到远程服务器

  1. 下载 Xdebug 到远程服务器

  2. 修改 php.ini
    打开 php.ini,添加 Xdebug 扩展(dll)的路径

    1
    2
    Linux and Mac OS: zend_extension="/usr/local/php/modules/xdebug.so"
    Windows: zend_extension="<path to .dll file>"
  3. 配置 Xdebug
    在 php.ini 中,添加配置,其中关键的几个是:remote_enable,remote_autostart,remote_port,remote_handler

    xdebug.auto_trace= "On"
    xdebug.collect_params= "On"
    xdebug.collect_return= "On"
    xdebug.trace_output_dir="/path/to/log/dir/xdebug/trace"
    xdebug.profiler_enable= "true"
    xdebug.profiler_output_dir="/path/to/log/dir/xdebug/profiler"
    xdebug.profiler_append = "On"
    xdebug.profiler_enable_trigger = "On"
    xdebug.profiler_output_name = "cachegrind.out.%t-%s"
    xdebug.remote_enable = "On" 
    xdebug.remote_autostart = 0  
    xdebug.remote_host = 127.0.0.1
    xdebug.remote_port = 9000 
    xdebug.remote_handler = "dbgp"
    xdebug.remote_log="/path/to/log/dir/remote.log"
    
  4. 验证安装是否成功
    远程打印<?php phpinfo(); ?>,查看是否安装了 Xdebug 模块。

B. 安装到 Zend Studio 运行环境(PHP Executable)

Zend Studio 自带了 PHP 运行环境的插件,在 <Zend_Studio_install_dir>\plugins\com.zend.php.debug.debugger.<version_info>\ 目录里。默认配置的是使用自家的 zend debug,切换成 xdebug,需要修改这里的 php 设置。

  1. 下载 Xdebug 到 <Zend_Studio_install_dir>\plugins\com.zend.php.debug.debugger.<version_info>\

  2. 修改 php.ini
    注释掉 zend debug,添加 Xdebug,写法和上节一样。

  3. 配置 Xdebug
    配置参数参见上节

  4. 验证安装是否成功
    打开命令行,执行php --re xdebug,如果输出不是Exception: Extension xdebug does not exist, 表示 Xdebug 扩展安装成功。

到这里,已经完成了配置 Xdebug 部分,其实现在已经可以使用多种工具来远程或本地调试了,包括设置断点、单步、查看运行参数等。反映较好的调式客户端有 PhpStorm,eclipse+PDT,netbeans,Notepad++等,Zend Studio 也算是 “eclipse+插件”性质的,下面将描述它的配置。顺道说一下,还有一个极好用的工具,是 Chrome 的插件 WebGDBp,可以直接在浏览器里远程调试,非常 Cool。

配置 Zend Studio

A. 配置 Xdebug CLI 调试

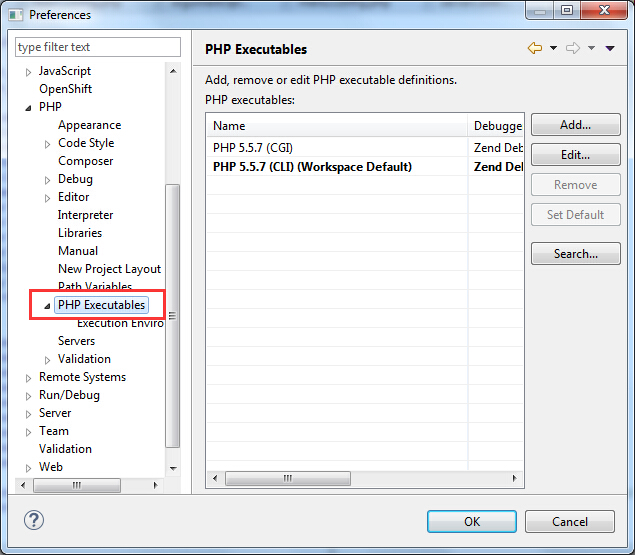
  1. 打开 Window | Preferences | PHP | PHP Executables

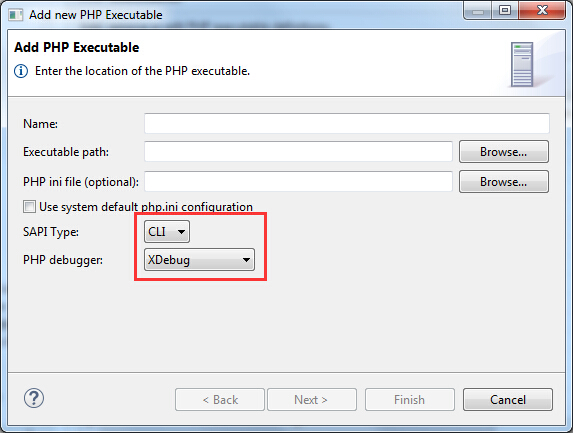
  2. 打开 Add ,添加 PHP 运行环境

    • Name - PHP 运行环境名(比如 PHP 5.5.7 with Xdebug)
    • Executable path - 运行环境路径.
    • PHP ini file (Optional) - 运行环境对应的 php.ini 路径
    • SAPI type - 设置为 CLI
    • PHP debugger - 设置为 Xdebug.
  3. 设置 Xdebug 为默认运行环境
    上一步保存后的回到运行环境设置窗口,选择添加的运行环境,点击 Set as Default

  4. 打开 Window | Preferences | PHP | Debug

    在 CLI 设置区,选择 Xdebug

到此,CLI 使用 Xdebug 已经配置完成。

B. 配置 Xdebug 远程调试

允许远程调试网站程序(Web Application Debugging)

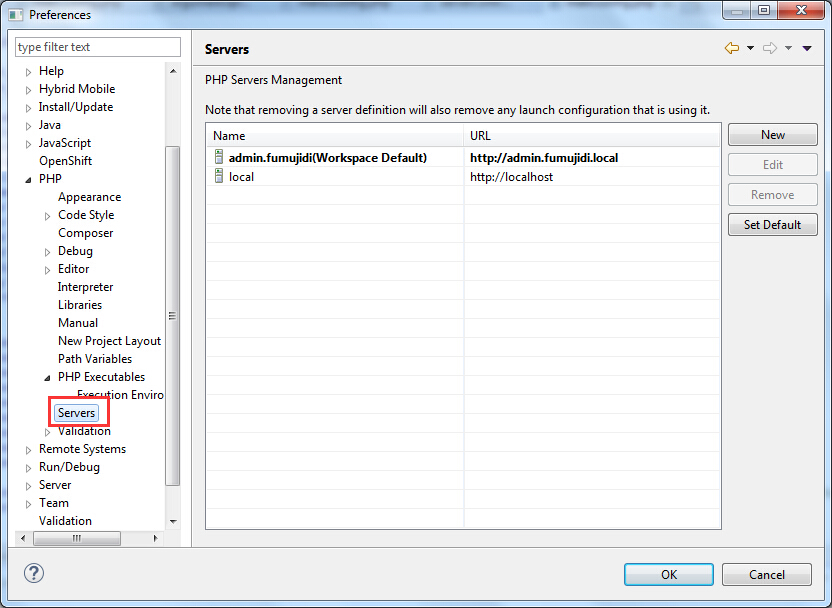
  1. 打开 Window | Preferences | PHP | PHP Servers

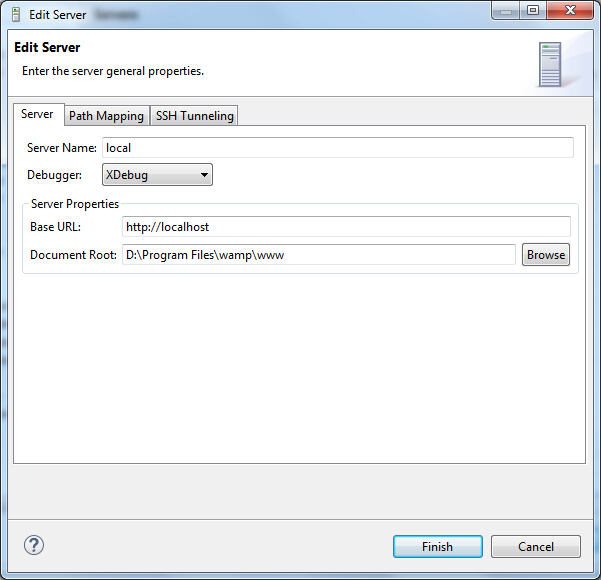
  2. 添加服务器(Server)

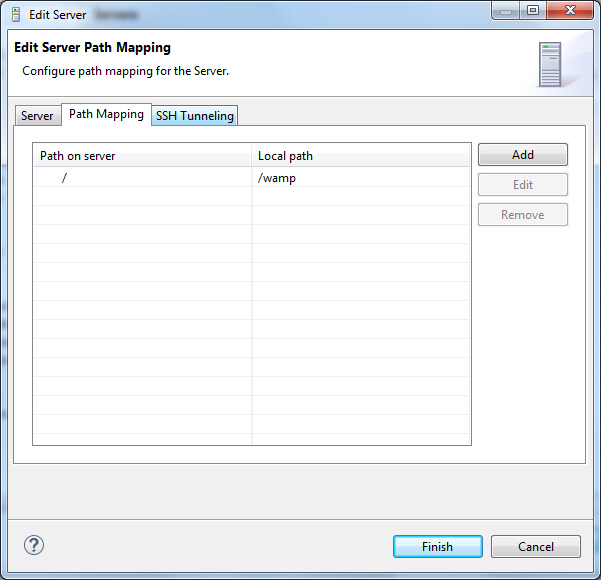
  3. 配置路径映射(Path Mapping)

  4. 配置 DBGp 协议
    由于是远程调试,使用了 DBGp 协议通信,需要配置通信参数。
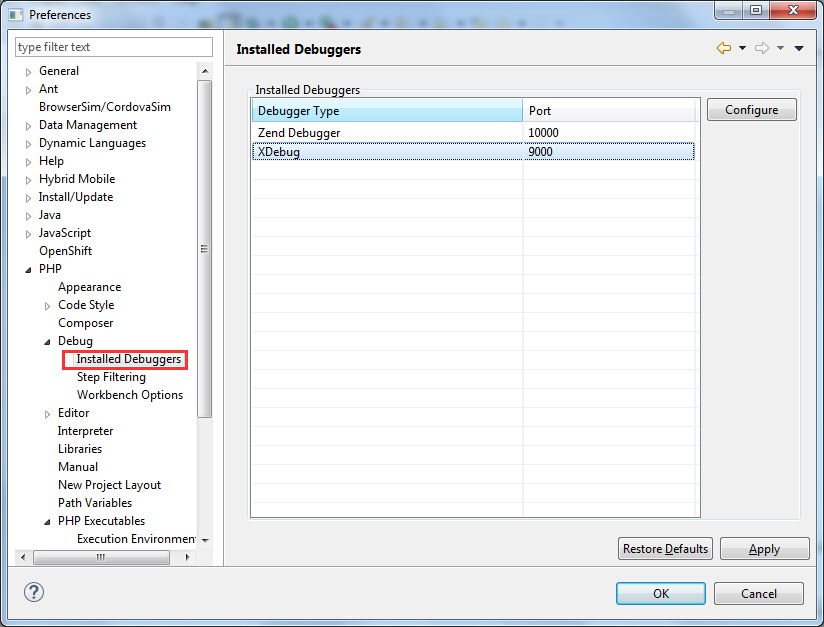
    打开 Window | Preferences | PHP | Debug | Installed Debuggers

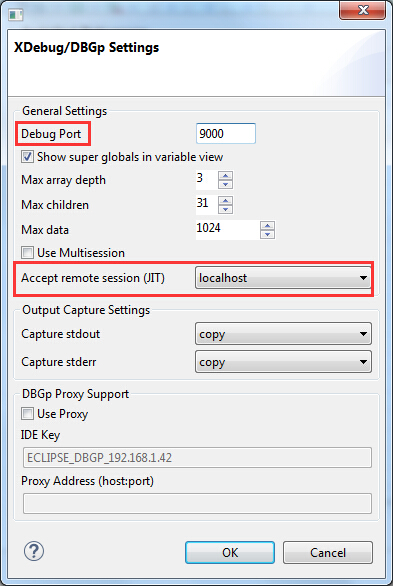
    编辑 Xdebug

    这里非常关键的地方是 Access reomte session (JIT),它能配置触发 Zend Studio 调试的条件。当我们从浏览器里访问要调试的网站时,可以选择:

    • off: 关闭远程调试功能
    • localhost: 通过 localhost 访问时触发调试
    • any: 任何访问都触发调试
    • prompt: 任何访问弹出提示,选择是否触发调试
      由于我一般都是内网调试,这里选择 localhost,然后配合网站 Xdebug 的配置 xdebug.remote_autostart = 0 来使用,只有当访问 localhost 时才触发 Zend Studio 进入调试状态。
  5. 开始调试
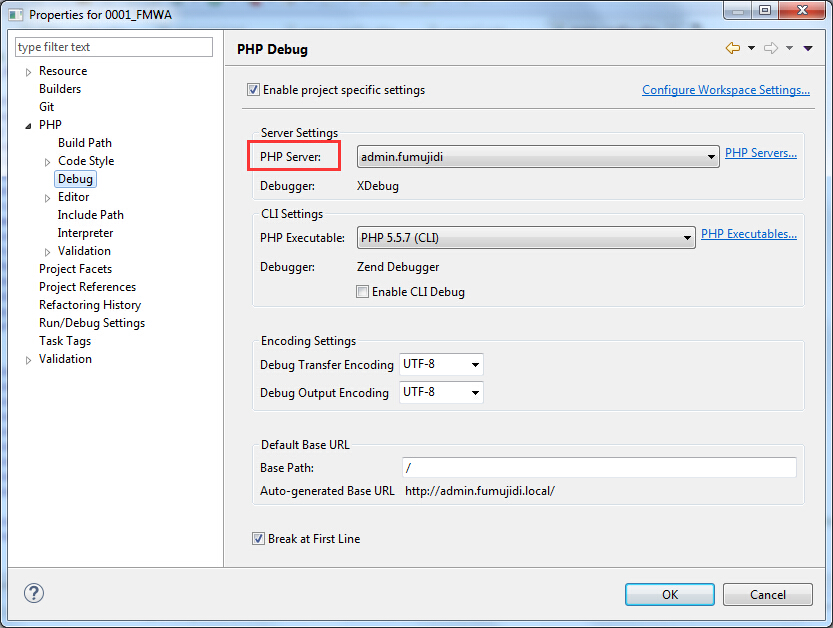
    (可选)为项目指定默认服务器

    现在 Xdebug 已经是这个项目的默认远程 PHP 调试器。你可以通过 Debug as web application 来调试某个文件。

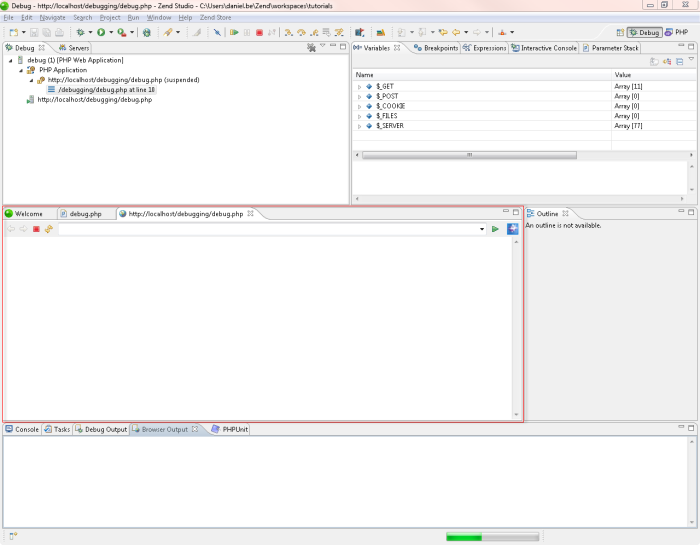
    查看结果:

GitHub,GitLab的多账户配置(Windows)

发表于 2014-11-26 | 分类于 git | | 阅读次数:

Windows 系统通过 SSH 方式使用 Git 时,如果有多个账户,需要手工配置多个 rsa 密钥,这里记录一下过程。下面以 GitHub 为例。

单个账号

1.生成密钥

打开 Git Bash,运行命令:

1
2
3
4
ssh-keygen -t rsa -C "your_email@example.com"
# Creates a new ssh key, using the provided email as a label
# Generating public/private rsa key pair.
# Enter file in which to save the key (/c/Users/you/.ssh/id_rsa): [Press enter]

下一步,输入密钥的口令:

1
2
Enter passphrase (empty for no passphrase): [Type a passphrase]
# Enter same passphrase again: [Type passphrase again]

执行后,将产生公钥、私钥对:

1
2
3
4
Your identification has been saved in /c/Users/you/.ssh/id_rsa.
# Your public key has been saved in /c/Users/you/.ssh/id_rsa.pub.
# The key fingerprint is:
# 01:0f:f4:3b:ca:85:d6:17:a1:7d:f0:68:9d:f0:a2:db your_email@example.com

2.将公钥、私钥加入到 ssh-agent

  • 命令方式:
1
2
3
4
# start the ssh-agent in the background
ssh-agent -s
# Agent pid 59566
ssh-add ~/.ssh/id_rsa
  • 或者手工将2个文件复制到 user/.ssh/ 目录

3.将公钥文件的内容复制到 GitHub 账户中

密钥是自己保存的,公钥是需要公开给你使用的网站。登录 GitHub 账户,从账户管理里找到密钥(SSH keys)配置,新建一个key,将公钥(一串 Base64 格式)文本复制到其中,并给这个 key 标记个名字。

标记个名字,方便多个账号同时使用时,方便管理。

4.测试

在 Git Bash 中输入:

1
2
ssh -T git@github.com
# Attempts to ssh to GitHub

会收到一个提示:

1
2
3
The authenticity of host 'github.com (207.97.227.239)' can't be established.
# RSA key fingerprint is 16:27:ac:a5:76:28:2d:36:63:1b:56:4d:eb:df:a6:48.
# Are you sure you want to continue connecting (yes/no)?

检查一下指纹(fingerprint)和你上面产生的密钥是否一致,然后输入yes.

最后,你将收到配置成功的消息 :)

1
2
Hi username! You've successfully authenticated, but GitHub does not
# provide shell access.

添加多个账户

上面操作时手工产生的id_rsa密钥文件放到username\.ssh\目录下,如果改成其它文件名,在连接时将出错,这就不能支持多个账号的ssh key。

(不过,我猜可能通过命令 ssh-add ~/.ssh/id_rsa 添加的 key 可能会自动产生多账号配置文件。有待验证!!!)

那如果有多个同名的id_rsa密钥对文件如何处理呢?

做法是添加一个配置文件,来管理(映射)密钥的关系,这只是 windows 的方案,Linux 自带 SSH agent 的。

1.创建管理文件

在 .ssh 目录下创建 config 文件,同时将产生的 id_rsa 文件改成较好记的名字,比如 username.github.com。

2.添加映射

打开 config 文件,添加:

1
2
3
4
5
6
7
8
9
10
11
12
13
Host github.com
User git
Hostname ssh.github.com
PreferredAuthentications publickey
IdentityFile ~/.ssh/username.github.com
Port 443

Host anothersite.com
User git
Hostname ssh.anothersite.com
PreferredAuthentications publickey
IdentityFile ~/.ssh/username.anothersite.com
Port 443

上面是2个密钥映射的关系,IdentityFile是改名后的文件,其它参数根据网站需要来更改。

优先级:hugging vs compression resistance

发表于 2014-11-12 | 分类于 ios | | 阅读次数:

开发IOS应用最快速的手段就是自动布局(auto layout)以及它的约束(constraint)机制,下面说几个属性。

1.内嵌内容大小(Intrinsic Content Size)

IOS本身依靠一套布局系统(layout system)完成计算各组件大小,最大限度满足尽可能多的约束,说尽可能多的原因是可能存在有冲突的约束,造成没法全部满足。回过头来说,设置了Intrinsic Content Size属性,一是就是通知布局系统本组件包含不容易知道大小的内容,二是会提示布局系统自身的大小,也就是组件本身可以知道自身内容大小。

常见的组件有UILabel, UIButton, 它们都设置了Intrinsic Content Size这个属性,也就是运行时会根据内容的大小来缩小或扩大。

参见苹果开发文档

2.内容保持紧固的优先级(Content hugging priority)

上面说组件会适应其内容大小。那会出现一个问题,例如,当组件还设置了其它约束条件,将左(leading)和右(trailing)边界固定(pinned)到了父视图(superview)上,假如内容宽度是200,父视图宽度是500,那么组件要应用哪个呢?

这时就很有必要为每个条件设置一个优先级,ios默认有高(1000)、中(750)和低(250)3个级别,当然如果需要比较的情况复杂,也可以为优先级设置任意0至1000的数值。

内容保持紧固的优先级指的是组件保持内容大小,不被拉伸的优先级别。

回到刚才的例子,将组件的Content hugging priority设置为251,而左右约束设置为250,这时组件会维持自身大小,不会随着父视图拉伸。

3.内容抵抗压缩的优先级(content compression resistance priority)

思路与上边相似,本属性指的是组件保持内容大小,不被压缩的优先级别。

试想上例中,如果父视图只有宽度只有100,组件内容是200,将组件的content compression resistance priority设置为751,而左右约束设置为750,这时组件会维持自身大小,不会随着父视图被压缩。

4. 附上一个讲的很清楚的例子

Say you’ve got button like this:

[ Click Me ]

and you’ve pinned the edges to a larger superview with priority 500.

Then, if Hugging priority > 500 it’ll look like this:

[Click Me]

If Hugging priority < 500 it’ll look like this:

[ Click Me ]

If superview now shrinks then, if the Compression Resistance priority > 500, it’ll look like this

[Click Me]

Else if Compression Resistance priority < 500, it could look like this:

[Cli..]

from stackoverflow

1…101112
程学彬

程学彬

117 日志
48 分类
99 标签
Creative Commons
Links
  • ShinySky
0%
© 2014 — 2020 程学彬